Integrating Fanplayr with your Magento 2 Store
Installing extensions for Magento 2 is a little more complex than with Magento 1.x and should be done by your developer. It involves having access to the command line to your website host, or development environment.
Download the Extension
Currently we suggest downloading the extension directly from here:
https://fanplayr.com/files/fanplayr_smartandtargeted-1.6.1.zip
Or from Packagist:
composer require fanplayr/smartandtargeted
Unzip to a temporary directory
Unzip the contents of the extension to a temporary directory. Move, or upload the 'SmartAndTargeted' directory to the following location:
/app/code/Fanplayr/
Disable the Cache
Log into your Admin area, then go to System / Tools / Cache Management. Select all cache types, choose "Disable" from the drop down list, and then Submit.
Console: Run Upgrade
Even though you have copied the extension files to your Magento 2 installation they will not be seen until the system scans for them. To do this you will locally you will need to open your console, or on a remote machine you will need terminal access.
Once you're in the terminal go to the root of your Magento 2 installation. Then run the following command:
php bin/magento setup:upgrade
This will update the app/etc/config.php file with details of your new module.
This process may ask you to rerun Magento compile. If you are not in a development environment you can do this with the following command:
php bin/magento setup:di:compile
If you have memory errors runs as follows
php -d memory_limit=-1 bin/magento setup:di:compile
Note: Even if your shop is in developer mode you may sometimes need to run compile for Fanplayr to finalize integration.
Add your Fanplayr Account Key
In your Admin area go to Stores / Settings / Configuration. You should now see a new option in the menu to the left, Fanplayr / Smart And Targeted.

You can now enter the Account Key given to you by your Fanplayr account manager. Make sure you click Save Config.
Re-enable the Cache
Log into your Admin area, then go to System / Tools / Cache Management. Select all cache types, choose "Enable" from the drop down list, and then Submit.
Testing / QA
Once Fanplayr has been installed you should be able to see the fanplayr variable in your Javascript console. If this variable is here we should check that all the information expected is being tracked on each page type. This will involve going to the specific page type and then looking at the fanplayr variable in your Javascript console to check that values are being tracked.
Page specific variables (User Tracking)
The specific variable you want to look at is as follows:
fanplayr._i[0].data
It should look like the following:
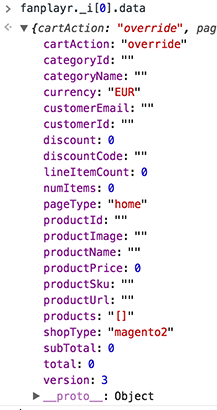
Home Page
There is only one variable you need to check here, the pageType which you will need to check on each page.
- pageType: "home"
Category Page
You should check a few category pages to make sure it is tracking correctly. The variables you need to look at:
- pageType: "cat"
- categoryId: This should be a number
- categoryName: This should be the name of the category
Product Page
Again, it's a good idea to check a few product pages:
- pageType: "prod"
- productId: The ID of the product.
- productImage: A URL which points to the main product image.
- productName: The name of the product.
- productPrice: The price of the product. Note for VAT/GST setups it will show the pre-tax price.
- productSku: The SKU of the product.
- productUrl: A URL which should point toward this product page.
Cart Page
The set up for this test is a little more complex. Please do the following:
- Add at least 2 products
- Make sure that one of these products has at least 2 (quantity) in the cart.
- Apply a coupon to the cart.
The cart details are tracked on all pages, but we will check the cart page itself:
- pageType: "cart"
- discount: The amount of discount applied.
- discountCode: The code used for discount.
- lineItemCount: The number of line items.
- numItems: The total quantity of items: line items X quantity.
- subTotal: The cart total before discounts, shipping or taxes.
- total: The cart total before shipping or taxes, but after discount.
- products: A JSON representation of products in the cart including the following details:
- id
- sku
- name
- price
- qty
- catId
Order Tracking
To test that order tracking is working please proceed making a test order using the same setup you have for the cart page testing above. That is, make sure you have multiple products and a discount applied.
Once you have placed the order you should be presented by a "Thank You" or "Order Complete" page. On this page you should be able to see the following variable in your Javascript console:
fp_sales_orders
If this variable is there everything should have tracked correctly. You can now log in to your Fanplayr account and see the order by going to:
- Account / Transactions
Note that even though transactions should show up quite soon after they are made, tracking of sessions will take a while longer to show up in your analytics. Please double check that the details in Account / Transactions are correct.
Session Offers
Fanplayr has the ability to restrict specific offers to your users so they can only be used once presented by Fanplayr. For more details please see the implementation guide:
https://fanplayr.gitbooks.io/integration-custom/content/session-offers.html
To test Session Offers please create a coupon with the prefix you have set in your Fanplayr Configuration.
- Apply this coupon to your cart. It should fail.
- Look at the
fanplayr._i[0].sessionOfferUrlJavascript variable. This should be a URL like thishttps://myshop.com/fanplayr/coupon/session/?coupon_code=%cincluding the%cat the end. - In a new tab go to this URL, replacing the
%cwith the coupon you just tried to use. - Try applying this coupon again. It should now apply correctly (given any other restrictions you have on the coupon such as minimum purchase etc).
If the above is all as expected you are good to go! Please don't hesitate to contact us with any questions you may have.
Custom Fanplayr Variables and Pre-Run JS
Depending on the setup of Magento you may need to define custom variables for Fanplayr to use. These are defined in JS at:
window.fanplayr.custom
Currently available varaibles are:
- embedUrl
- doNotTrack
- accountKey
- storeDomain
- applyToCartUrl
- sessionOfferUrl
[Details of what each variable does coming later]
As Magento 2 does not easily allow you to enter JS to appear on all pages ie Magento 1, we have added the ability to add a JS snippet before any Fanplayr specific code is embedded.
You enter the code by going to Stores / Settings / Configuration / Fanplayr / Smart and Targeted / Extras
An example of the JS you would add to change the embedUrl is below:

Custom Variables
- embedUrl: Use this to override the default base URL that Fanplayr will use to access the internal Fanplayr calls.
- doNotTrack: If set to anything that is truthy, it will do no tracking for this page.
- accountKey: Use to override the Fanplayr Account Key.
- storeDomain: Use to override the domain. ie track domain per language
- applyToCartUrl: Use to override the Apply To Cart URL. May need to be set if embeUrl changes.
- sessionOfferUrl: Use to override the Session Offer URL. May need to be set if embeUrl changes.